

Our Mediterranean kitchen is built on simple and honest food and nothing is more honest than a perfect loaf of bread. This rustic peasant bread recipe captures the spirit of old-world European simplicity, requiring only four common ingredients and zero kneading. Additionally, it delivers a stunningly soft and hole-filled crumb encased in a thick, golden and crusty peasant bread shell.
Whether you call it no-knead peasant bread, French peasant bread recipe or simply bowl bread, this foolproof method is the perfect place to start your baking journey. Just forget complex techniques; this is the true taste of rustic and simple life, baked right in your own kitchen.
What Is Peasant Bread?
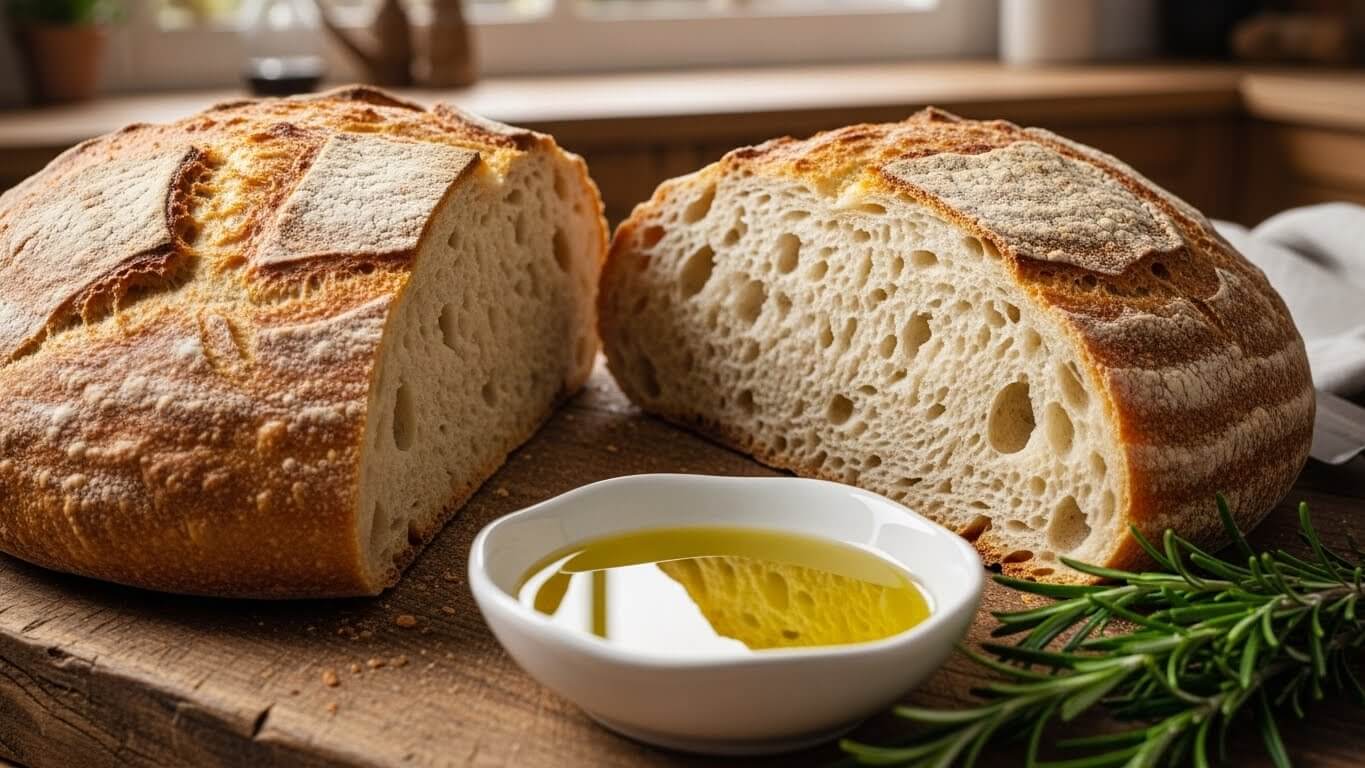
Peasant bread is a simple, rustic type of everyday bread historically made by working-class families across Europe, often utilizing basic local ingredients like flour, water, yeast and salt. It is also defined by its humble origins, minimal ingredients and no-knead preparation method. The resulting loaf is dense yet soft, with an irregular, hole-filled crumb and a thick, savory crust, which is a perfect vessel for soaking up olive oil or accompanying a hearty stew.
Peasant bread is an unfussy, rustic, everyday loaf, traditionally prepared with basic ingredients and without the laborious kneading required for richer, “finer” breads. Its simplicity makes it beginner-proof and ideal for the Mediterranean diet recipe style of cooking.
Origins of Peasant Bread (A Rustic European Tradition)
The history of peasant bread or pain de campagne in France is rooted in the practical necessities of medieval Europe. Before modern milling, flour was often coarse and less refined. And peasants would bake their daily loaves using the simplest possible method: mixing the dough and allowing time (not muscle) to develop the gluten.
This tradition transitioned into the modern, viral “no-knead” technique popularized today, preserving the spirit of simplicity and efficiency. It was, and remains a practical daily bread designed to be filling, nutritious and easy to bake with minimal fuss, which is a direct contrast to the finer and more expensive breads consumed by the wealthy. The modern version is higher hydration, making it even easier to handle and producing a softer and more desirable crumb than its denser ancestors.
Why This Rustic Peasant Bread Recipe Works
Your goal is a loaf that looks and tastes complex but requires virtually no effort. This is achieved by focusing on two key elements: No-Kneading and High Hydration.
- No Kneading: We allow time to do the work. For this, over a long, slow rise (fermentation), the flour and water interact, naturally developing the complex gluten structure that gives the bread its texture and air pockets.
- High Hydration: This recipe uses a relatively high ratio of water to flour (sticky dough). This excess moisture makes the dough highly extensible (stretchy), which promotes a spectacular oven spring and a soft, chewy interior crumb.
- Foolproof Rise: The simple bowl bread method traps the gases, leading to a consistently reliable and tall loaf.
- Soft Crumb, Golden Crust: The combination of a high-hydration dough and a high initial baking temperature ensures a soft, airy interior while flash-creating a crackly and golden crust.
Peasant Bread Ingredients
The beauty of this loaf lies in its minimalist ingredient list, which perfectly aligns with the principles of our Mediterranean diet.
| Ingredient | Role | Mediterranean Note |
| All-Purpose Flour | Provides structure; the primary ingredient. | Use unbleached flour for the best flavor. |
| Active Dry Yeast | The leavening agent creates gas bubbles. | Necessary for the signature airy crumb. |
| Warm Water | Activates the yeast and hydrates the flour. | Use water around 105-115°F (40-46°C). |
| Kosher Salt | Controls the yeast activity and, critically, adds flavor. | Do not skip or reduce salt; it’s essential! |
| Olive Oil (Optional) | Used for greasing the bowl; adds a slight richness. | A Mediterranean diet staple. |
Peasant Bread Ingredient Substitutions
| Ingredient to Substitute | Recommended Substitution | Notes |
| All-Purpose Flour | Bread Flour | Provides a slightly chewier crumb. |
| Active Dry Yeast | Instant Yeast | Mix directly with dry ingredients; no need to proof in water. |
| Water | Milk or Buttermilk | For a softer and richer crumb (less traditional). |
| Salt | Sea Salt | Use the same amount by weight/volume. |
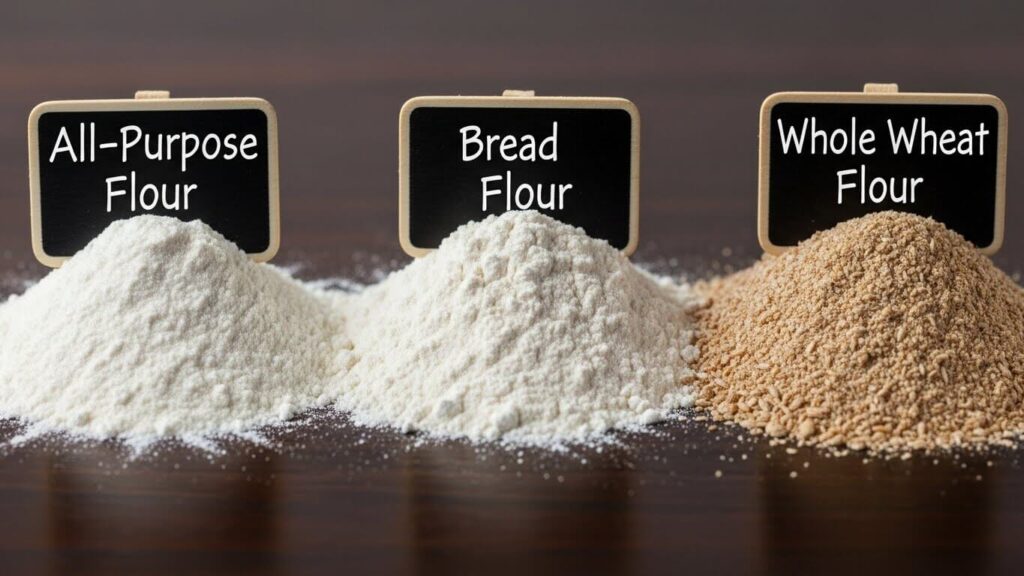
What Kind of Flour Is Best for Peasant Bread?
While simple in concept, the type of flour you choose can significantly impact the final texture of your rustic loaf.
| Flour Type | Protein % (Approx.) | Results in Peasant Bread | Best For… |
| All-Purpose (AP) | 10-12% | Standard and soft crumb; classic rustic peasant bread. | Beginners and everyday loaves. |
| Bread Flour | 12-14% | Chewier texture, higher rise due to a strong gluten network. | A truly crusty and artisanal-style loaf. |
| Whole Wheat | 13-15% | Nutty flavor and denser loaf; requires slightly more water. | A healthier and more traditional peasant loaf. |
| 00 Flour | 8-11% | Very tender, often used in Italian baking; less rustic crust. | A softer interior with an Italian Mediterranean flavor (e.g focaccia). |
Our Recommendation: Start with All-Purpose flour. Because it’s the easiest to handle, consistently available and delivers the perfect balance of a tender interior and a sturdy crust.
How to Make Peasant Bread (Step-by-Step Recipe)
This peasant bread recipe is easy method eliminates the mess and effort of kneading, relying entirely on the simple “bowl bread” technique.
- Activate the Yeast: In a large mixing bowl, whisk the yeast into the warm water. And then, let it sit for 5-10 minutes until foamy. (If using instant yeast, you can skip this proofing step and mix it with the dry ingredients).
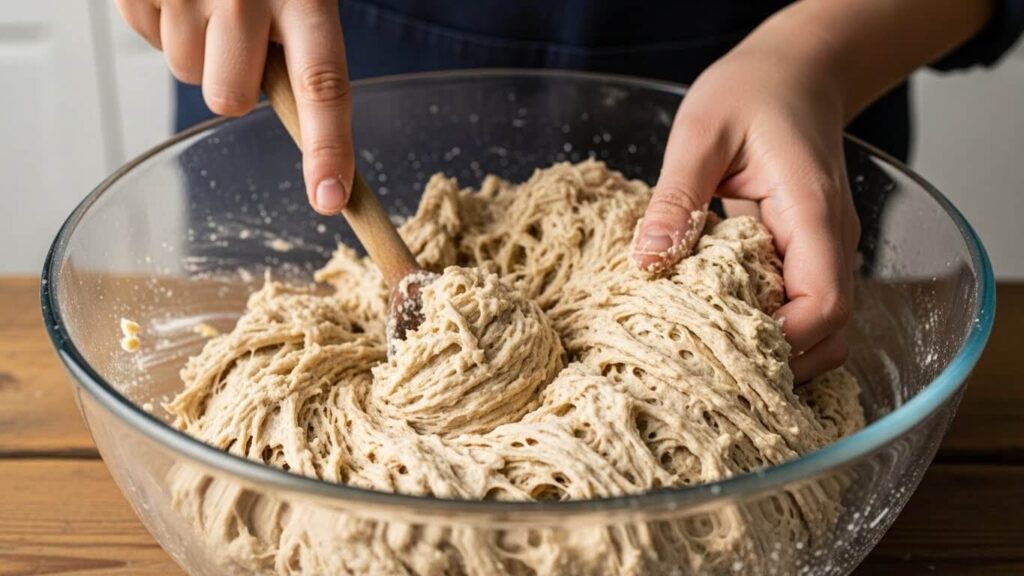
- Combine Ingredients: Add the flour and salt to the yeast mixture. Using a wooden spoon or a spatula, mix until just combined. Remember: Do not overmix. The dough will be very shaggy, sticky and wet.
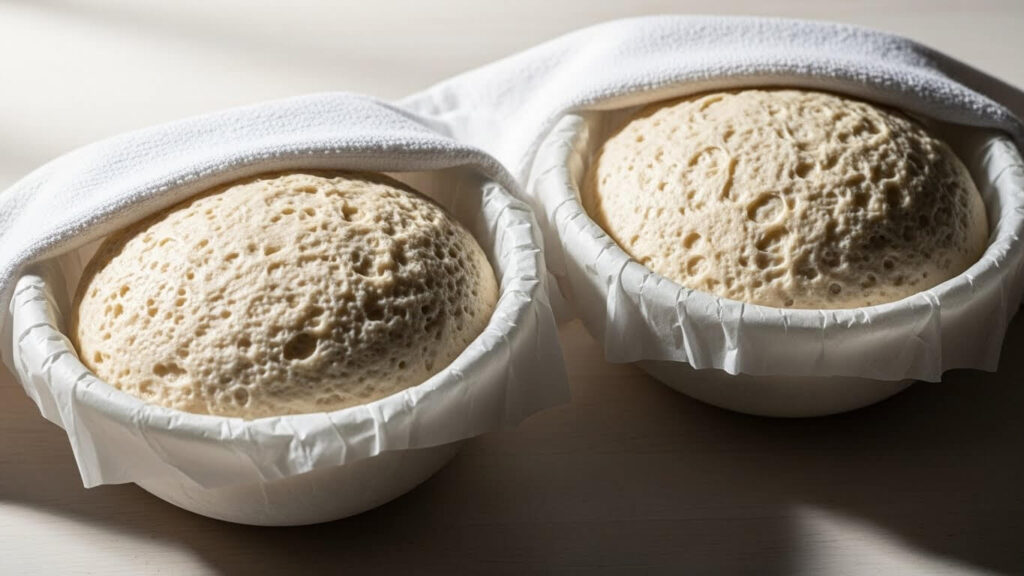
- The First Rise (Bulk Fermentation): Lightly coat the dough with olive oil (a great Mediterranean touch!) and cover the bowl tightly with plastic wrap. Let it rest at room temperature (around 70°F/21°C) for 1.5 to 2 hours or until the dough has doubled in size and has visible bubbles.
- Shape & Second Rise: Gently turn the dough out onto a lightly floured surface. Using floured hands, lightly fold the sides of the dough in toward the center a few times; this is your minimal “folding”, not kneading. Now, place the dough seam-side down into a parchment-lined, oven-safe bowl (or two 1-quart Pyrex bowls for traditional shaping). Lastly, cover and let it rise again for 30 minutes.
- Bake: Score the top of the loaf with a sharp knife or razor blade (optional, but lovely). And follow the temperature guide below.
No-Knead Bowl Bread Method Explained
The no-knead method works because we embrace a sticky dough (high hydration).
- Why Sticky Dough Is Good: The extra water in the dough allows the gluten strands to stretch and slide past each other more easily during the long rise. This relaxed development creates the large, airy bubbles (alveoli) characteristic of the best artisan-style loaves.
- Why Bowls/Pans Work: Baking the dough directly in a heavy, oven-safe bowl or pot (like Pyrex or a Dutch Oven) forces the dough to rise up instead of spreading out. This creates the tall and spherical shape that is iconic of bowl bread or true peasant loaves.
- How This Differs from Artisan Loaves: While both use the no-knead technique, true artisan loaves (like sourdough) often use a starter (levain) and involve multiple gentle folds during the bulk fermentation. And shockingly, peasant bread, in its purest form, is even simpler; just mix, wait and bake.
What Temperature to Cook Peasant Bread?

Achieving the perfect and crusty peasant bread recipe crust requires a specific temperature strategy. This creates steam and sets the structure early, then allows the inside to cook slowly.
- Start Temperature: Preheat your oven to 425°F (220°C). Then bake the bread at this temperature for the first 15 minutes.
- Why: This high heat promotes an initial “oven spring” (rapid rise) and quickly sets the crust, creating a solid structure for the loaf.
- Finish Temperature: Reduce the oven temperature to 375°F (190°C) for the remaining 20-25 minutes.
- Why: The lower temperature prevents the crust from burning while ensuring the interior is fully cooked through without drying out.
The bread is done when the crust is deep golden-brown and the internal temperature registers 200-210°F (93-99°C) with a digital thermometer.
Peasant Bread vs Artisan Bread vs Regular Bread
Understanding the differences between bread types is key to appreciating the rustic peasant bread you just baked.
| Characteristic | Peasant Bread | Artisan Bread (e.g., Sourdough) | Regular Sandwich Bread |
| Kneading | No-knead (time-driven) | Hand-kneaded or gentle folding | Machine-kneaded (efficient) |
| Ingredients | Minimal (Flour, water, yeast and salt) | Minimal + Starter (Levain) | Flour, water, yeast, salt, sugar and oil/fat |
| Crust | Thick, rustic, golden and chewy | Thick, deeply colored and highly blistered | Thin, soft and often buttery |
| Crumb (Interior) | Soft, irregular holes (alveoli) | Open, airy, complex hole structure | Tight, uniform, soft |
| Usage | Everyday meal and dipping in olive oil recipes | Gourmet, specific dishes and sandwiches | Toast, school lunches and sandwiches |
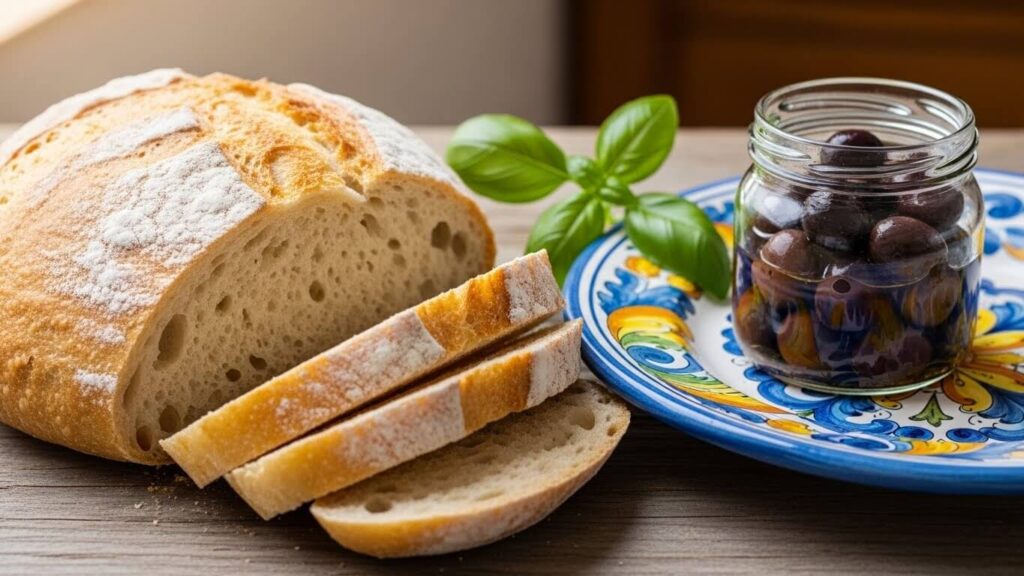
French Peasant Bread & Mediterranean Variations
Peasant bread, or pane cafone in Italy, is a blank slate perfect for regional twists that fit your site’s niche and our Mediterranean Diet Pantry Essentials: The Complete Beginner’s Guide.
- Olive Oil Version (Italian Peasant Bread): Substitute the water used to grease the bowl with high-quality extra virgin olive oil. Before the final bake, lightly brush the top of the loaf with olive oil and sprinkle with coarse sea salt and dried oregano or rosemary.
For olive oil selection you can read our article: Best Olive Oil for Mediterranean Cooking: A Complete Guide - Herb-Infused Loaf: Add 2 tablespoons of dried Italian herbs (oregano, basil and thyme) or fresh chopped rosemary and sage into the dry flour before mixing. This works wonderfully when serving with dishes like hummus recipe or Escalivada recipe.
For more depth you can read: The 12 Essential Herbs and Spices for Authentic Greek Cooking - Whole Wheat Rustic Loaf: Substitute up to 1/2 of the All-Purpose flour with Whole Wheat or Spelt flour for a nuttier and heartier peasant loaf, perfect for pairing with a Tuscan white bean soup.
Best Peasant Bread Recipe
Ingredients
Equipment
Method
- Proof the Yeast (Active Dry): In a large bowl, whisk the yeast and sugar (if using) into the lukewarm water. Now, let it sit for 5-10 minutes until foamy.
- Combine: Add the flour and salt to the wet mixture. And use a wooden spoon or rubber spatula to mix until the flour is just absorbed and the dough forms a very sticky, shaggy ball. And do not knead or overmix.
- Rest: Lightly coat the dough with olive oil and cover the bowl tightly with plastic wrap or a damp towel.
- Rise: Let the dough rest in a warm, draft-free spot for 1.5 to 2 hours or until it has doubled in size and has visible bubbles. (For a deeper flavor, this step can be done in the refrigerator for 8-12 hours).
- Prep Bowl: Generously grease your oven-safe baking vessel(s) (e.g one Dutch oven or two 1-quart Pyrex bowls) with butter or olive oil.
- Deflate & Shape: Gently turn the dough out onto a lightly floured surface. Now, using floured hands, gently pat the dough into a rough round and lightly fold the sides in toward the center a few times. (If making two small loaves, divide the dough in half with a sharp knife or two forks).
- Transfer: Place the dough, seam-side down, into the prepared baking vessel(s).
- Second Rise: Leave the dough uncovered or loosely covered on the counter for 20 to 30 minutes or until it has crowned just above the rim of the bowl.
- Preheat: Place a rack in the middle of the oven and preheat the oven and your baking vessel (if using a Dutch Oven or lidded pot) to 425°F (220°C).
- Bake (High Temp): Score the top of the loaf with a sharp knife or razor blade (optional). Then transfer the vessel(s) to the oven. Bake at 425°F (220°C) for 15 minutes.
- Bake (Low Temp): Reduce the oven temperature to 375°F (190°C). Now, continue baking for 20-25 minutes more or until the crust is deep golden brown and the internal temperature is 200°F and 210°F, which is the same as 93°C to 99°C.
- Cool: Carefully remove the bread from the oven and immediately turn it out onto a wire rack to cool completely before slicing (at least 30 minutes).
Notes
- Yield: This recipe can be easily halved to make one smaller loaf or doubled (using a very large mixing bowl) to make two large loaves.
- Flour Check: If your dough feels too wet after mixing, add flour 1 tablespoon at a time. And if it seems too dry, add water 1 teaspoon at a time. Additionally, the dough must remain very sticky for the no-knead technique to work.
- Crust: For the absolute crispiest crust, use a Dutch oven and bake the loaf covered for the first 15 minutes, then uncovered for the rest of the time.
Peasant Bread Storage, Freezing & Make-Ahead Tips
This robust and rustic loaf stores much better than typical sandwich bread, but a few tricks will maximize its freshness.
- Room Temperature: Store the cooled bread uncut at room temperature, wrapped loosely in a clean linen towel or placed cut-side-down on a cutting board. Remember: Do not refrigerate, as this will cause the starches to dry out quickly. Also, it will keep well for 2-3 days.
- Freezing: For long-term storage, cool the loaf completely, then wrap it tightly in aluminum foil, followed by a layer of plastic wrap or a freezer bag. Then freeze it for up to 3 months. Thaw overnight at room temperature, then refresh the crust by baking in a 350°F (175°C) oven for 5-10 minutes.
- Make-Ahead Dough: The bulk fermentation (first rise) can be done in the refrigerator overnight (8-12 hours). This slow and cold rise develops a more complex, slightly sour flavor. And just be sure to allow the dough to sit at room temperature for 30-60 minutes before shaping.
FAQs About Peasant Bread
What is peasant bread?
Peasant bread is a rustic and simple loaf made with minimal ingredients (flour, water, yeast and salt) and a no-knead technique, traditionally consumed as a staple, everyday bread throughout Europe.
What kind of flour is best for peasant bread?
All-Purpose flour is the best and easiest flour for a classic peasant bread recipe, delivering a balanced soft crumb and a crispy crust. Additionally, bread flour can be used for a chewier loaf, while whole wheat adds a rustic and nutty flavor.
What’s the difference between artisan bread and regular bread?
Artisan bread is typically handcrafted, uses minimal ingredients, often employs a long fermentation/sourdough starter and has a thick, complex crust. While regular sandwich bread is mass-produced, often includes fats and sugars and is designed to have a soft, thin crust and a uniform crumb. Peasant bread falls closer to the artisan category due to its rustic nature and simple ingredient list.
What temperature to cook peasant bread?
The best way to cook peasant bread is to start at a high temperature of 425°F (220°C) for 15 minutes to maximize the rise, then reduce the heat to 375°F (190°C) for the remaining 20-25 minutes to ensure the interior cooks through evenly.